1. Declare the file types as Document Types
Within your Xcode project, add a Document Type for all the file formats your application supports. Set the Role of each type according to your application's abilities:
- Mark read/write capable file types as Editor;
- Mark import only file types as Viewer.
Set the Class to the document type you want to handle each file type. One document class can handle multiple file types.
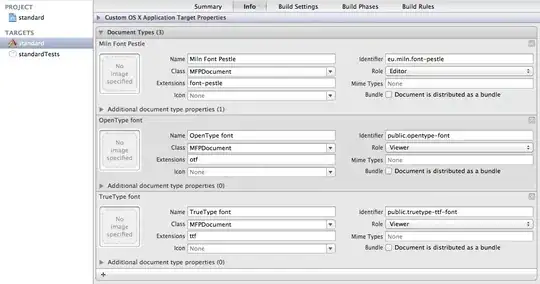
In the example below, there are three file types declared: font-pestle, otf, and ttf. The first, font-pestle, is the native format of the application. This type has the role Editor.
The remaining two formats, otf and ttf, can be imported but not written by the application; thus they are marked as Viewer.
2. Additional file types in your NSDocument subclass
With the Document Types added, the application will automatically allow users to open files of the specified types.
You need to add file type handling code to your document class. In the ideal case, add the branching code to the readFromData:ofType:error: method:
- (BOOL)readFromData:(NSData*)someData ofType:(NSString*)typeName error:(NSError**)outError
{
    if ([NSWorkspace.sharedWorkspace type:@"eu.miln.font-pestle" conformsToType:typeName] == YES)
    {
        // read native format
    }
    else if ([NSWorkspace.sharedWorkspace type:@"public.opentype-font" conformsToType:typeName] == YES)
    {
        // read import only format

        // disassociate document from file; makes document "untitled"
        self.fileURL = nil;
        // associate with primary file type
        self.fileType = @"eu.miln.font-pestle";

    }
    else // ...

}
The self.fileURL = nil; is important. By setting fileURL to nil, you are saying the document is not associated with any on-disk file and should be treated as a new document.
To allow auto-saving, implement the NSDocument method autosavingFileType to return the primary file type.