Answer gist
You can use branca to inject HTML and CSS (can be used to add a custom legend, draggable too).
Here's a basic example based on this branca demo nbviewer
Preview
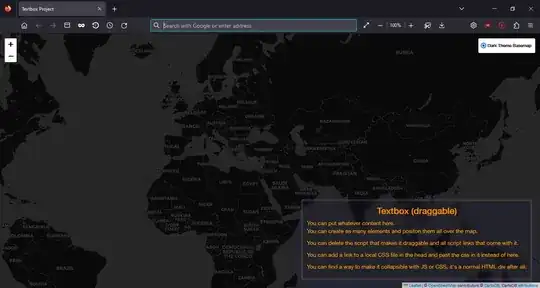
You can see that I can customize even the title of the tab of the browser. In case your hosting the file on GitHub Pages or somewhere else, you can have your project name on the tab, add an icon... etc.
Code
import folium
from branca.element import Template, MacroElement
import webbrowser

# main map
m = folium.Map(location=[35, 38], tiles=None, zoom_start=3)

# adding a basemap
dark_basemap = folium.TileLayer("cartodbdark_matter", name="Dark Theme Basemap").add_to(m)

# Injecting custom css through branca macro elements and template, give it a name
textbox_css = """
{% macro html(this, kwargs) %}
<!doctype html>
<html lang="en">
  <head>
    <meta charset="utf-8">
    <meta name="viewport" content="width=device-width, initial-scale=1">
    <title>Textbox Project</title>
    <link rel="stylesheet" href="//code.jquery.com/ui/1.12.1/themes/base/jquery-ui.css">
    <link rel="stylesheet" href="https://cdnjs.cloudflare.com/ajax/libs/font-awesome/6.2.1/css/all.min.css" integrity="sha512-MV7K8+y+gLIBoVD59lQIYicR65iaqukzvf/nwasF0nqhPay5w/9lJmVM2hMDcnK1OnMGCdVK+iQrJ7lzPJQd1w==" crossorigin="anonymous" referrerpolicy="no-referrer"/>
    <script src="https://code.jquery.com/jquery-1.12.4.js"></script>
    <script src="https://code.jquery.com/ui/1.12.1/jquery-ui.js"></script>

    <script>
      $( function() {
        $( "#textbox" ).draggable({
          start: function (event, ui) {
            $(this).css({
              right: "auto",
              top: "auto",
              bottom: "auto"
            });
          }
        });
      });
    </script>
  </head>

  <body>
    <div id="textbox" class="textbox">
      <div class="textbox-title">Textbox (draggable)</div>
      <div class="textbox-content">
        <p>You can put whatever content here.<br>You can create as many elements and positon them all over the map.</p>
        <p>You can delete the script that makes it draggable and all script links that come with it.</p>
        <p>You can add a link to a local CSS file in the head and past the css in it instead of here.</p>
        <p>You can find a way to make it collapsible with JS or CSS, it's a normal HTML div after all.</p>
      </div>
    </div>

</body>
</html>

<style type='text/css'>
  .textbox {
    position: absolute;
    z-index:9999;
    border-radius:4px;
    background: rgba( 28, 25, 56, 0.25 );
    box-shadow: 0 8px 32px 0 rgba( 31, 38, 135, 0.37 );
    backdrop-filter: blur( 4px );
    -webkit-backdrop-filter: blur( 4px );
    border: 4px solid rgba( 215, 164, 93, 0.2 );
    padding: 10px;
    font-size:14px;
    right: 20px;
    bottom: 20px;
    color: orange;
  }
  .textbox .textbox-title {
    color: darkorange;
    text-align: center;
    margin-bottom: 5px;
    font-weight: bold;
    font-size: 22px;
    }
</style>
{% endmacro %}
"""
# configuring the custom style (you can call it whatever you want)
my_custom_style = MacroElement()
my_custom_style._template = Template(textbox_css)

# Adding my_custom_style to the map
m.get_root().add_child(my_custom_style)

# Adding the layer control
folium.LayerControl(collapsed=False).add_to(m)

# save the map as html
m.save("m.html")

# opens in default browser
webbrowser.open("m.html")
I added glassmorphism effect for the fun but you can do a lot with it.