4

I am trying to read a .tif or .tiff floating point gray scale image in OpenCV.

I can read and write routine file format such as png, jpg etc but I am not able to read from my Desktop a format I never used before which is .tif or .tiff format.

The image: the image I am trying to read has the following parameters: Size:

size image

And width and height:

widthHeight image

After some documentation and various sources I was able to understand that it is possible to use a convertTo function to convert between available data types, the source can be found here. However this didn't work well and I actually had a compilation error saying:

OpenCV(3.4.1) Error: Assertion failed (size.width>0 && size.height>0) in imshow, file /home/to/opencv/modules/highgui/src/window.cpp, line 356 terminate called after throwing an instance of cv::Exception what(): OpenCV(3.4.1) /home/to/opencv/modules/highgui/src/window.cpp:356: error: (-215) size.width>0 && size.height>0 in function imshow

The code I am using is the following:

#include <opencv2/core.hpp>
#include <opencv2/imgcodecs.hpp>
#include <opencv2/highgui.hpp>
#include <iostream>
#include <string>
using namespace cv;
using namespace std;

int main( int argc, char** argv )
{
    Mat img = imread("/home/to/Desktop/example.tif");
    cv::imshow("source",img);
    Mat dst;  // destination image

    // check if we have RGB or grayscale image
    if (img.channels() == 3) {
        // convert 3-channel (RGB) 8-bit uchar image to 32 bit float
        img.convertTo(dst, CV_32FC3);
    }
    else if (img.channels() == 1) {
        // convert 1-chanel (grayscale) 8-bit uchar image to 32 bit float
        img.convertTo(dst, CV_32FC1);
    }

    // display output, note that to display dst image correctly
    // we have to divide each element of dst by 255 to keep
    // the pixel values in the range [0,1].
    cv::imshow("output",dst/255);
    waitKey();
}

Additional example I tried to make it work is directly from the OpenCV documentation which can be found here, with a small modification though. I read from official documentation that the options IMREAD_ANYCOLOR | IMREAD_ANYDEPTH should also be activated and in fact is what I did in the second additional trial below:

#include <opencv2/core.hpp>
#include <opencv2/imgcodecs.hpp>
#include <opencv2/highgui.hpp>
#include <iostream>
#include <string>
using namespace cv;
using namespace std;

int main( int argc, char** argv )
{
    String imageName( "/home/to/Desktop/example.tif" ); // by default
    if( argc > 1)
    {
        imageName = argv[1];
    }
Mat image;
Mat outImage;
image = imread( imageName, IMREAD_ANYCOLOR | IMREAD_ANYDEPTH ); // Read the file
if( image.empty() )                      // Check for invalid input
{
    cout <<  "Could not open or find the image" << std::endl ;
    return -1;
}
namedWindow( "Display window", WINDOW_AUTOSIZE ); // Create a window for display.

resize(image, outImage, cv::Size(500,500));

imshow("orig", image);
imshow("resized", outImage);


// Show our image inside it.
waitKey(0); // Wait for a keystroke in the window
return 0;

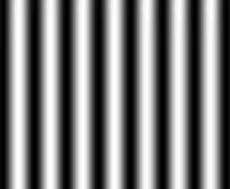
This time the compiler runs without any error but no image is shown as it is possible to see from the print screen below:

image

UPDATE

This is the result after the cv::resize

resized

UPDATE 2

This the result after applying imshow("Display window", image*10);

5

Is there something that I am missing from the official documentation or something else I am forgetting to do? Thanks for shedding light on this issue.

Emanuele
  • 2,194
  • 6
  • 32
  • 71
  • You might need to scale the image for display. By the way: that's not a compilation error, but a runtime error. – Cris Luengo Jul 02 '19 at 20:24
  • @CrisLuengo, thanks for taking the time to read my question. What should I add to the code to show the image? – Emanuele Jul 02 '19 at 20:27
  • Since you have an all-black image display, multiplying the image by some value should make it bright enough to see. Try `imshow( "Display window", image*10)`, then increase that value until you see something. However, if `imread` converted the floating-point values to uint8, the information might have gotten lost. – Cris Luengo Jul 02 '19 at 20:39
  • [By "scale the image" I meant scale the intensities, not the geometry.] – Cris Luengo Jul 02 '19 at 20:40
  • I resized the image but I still see a black result – Emanuele Jul 02 '19 at 20:41
  • Ok I added `imshow( "Display window", image*10)` but I get a strange effect now as it is possible to see from the second update print screen carrying a green and a blue square. Any idea of what is happening? And the blue box is zooming in or out within the green box. – Emanuele Jul 02 '19 at 20:49
  • Please share your TIFF file, it may be 16-bit, or 32-bit. – Mark Setchell Jul 02 '19 at 21:28
  • You can download the image [here](https://www.dropbox.com/s/urmtuwqu1vx8h81/auau_example.tif?dl=0) – Emanuele Jul 02 '19 at 23:42

1 Answers1

5

Your image is composed of a single channel of 64-bit floats which range from -219.774 to -22.907. I can tell that using tiffutil which is shipped with libtiff:

tiffutil -verboseinfo  image.tif

TIFFReadDirectory: Warning, Unknown field with tag 33550 (0x830e) encountered.
TIFFReadDirectory: Warning, Unknown field with tag 33922 (0x8482) encountered.
TIFFReadDirectory: Warning, Unknown field with tag 42113 (0xa481) encountered.
Directory at 0x256b3a2
  Image Width: 2277 Image Length: 2153
  Bits/Sample: 64
  Sample Format: IEEE floating point
  Compression Scheme: none
  Photometric Interpretation: "min-is-black"
  Samples/Pixel: 1
  Rows/Strip: 1
  Number of Strips: 2153
  Strips (Offset, ByteCount):
     17466, 18216
     35682, 18216
     53898, 18216
     ...
     ...

I am not certain exactly what you plan to do, but as a first stab, you can just add 220 to every pixel and convert to unsigned char and your range will be 0 to 197 which is perfectly displayable:

enter image description here

I actually did it using Python because I am quicker with that, but the C++ will follow exactly the same format:

import cv2

# Load image
img = cv2.imread('image.tif',cv2.IMREAD_UNCHANGED)

# Add 220 to all values, round to unsigned 8-bit and display
Image.fromarray((img+220).astype(np.uint8)).show()
Mark Setchell
  • 191,897
  • 31
  • 273
  • 432
  • Thanks for that. That is exactly the image. Can you please post the updated code? – Emanuele Jul 03 '19 at 19:02
  • What I plan to do with that is passing that image (which is an underwater survey) into a [grid](https://github.com/anybotics/grid_map) using `ROS`. There is in fact a function I can use [GridMapCvConverter](http://docs.ros.org/kinetic/api/grid_map_cv/html/classgrid__map_1_1GridMapCvConverter.html) to leverage that survey and to turn into a grid. – Emanuele Jul 03 '19 at 19:03
  • Could you post the python script you used please? Thank you very much for your time in helping with this issue. Really appreciated! :) – Emanuele Jul 03 '19 at 19:23
  • Ooops yes I see, Thanks! :) – Emanuele Jul 03 '19 at 19:27