1

I'm using

montage *.tif output.tif

to combine several images to one. I would now like them to be numbered (sometimes 1,2,3 …; somtimes A,B,C …) What possibilities are there to label the single images in the combined? Is there an option to put the label not underneath the picture but eg in the upper left or lower right corner?

Unfortunately I could't really figure out how to use the -label command to achieve that. Thanks for any suggestions.

Mojo Dodo
  • 67
  • 10

3 Answers3

5

If you want to invest a little more effort you can have more control. If you do it like this, you can label the images "on-the-fly" as you montage them rather than having to save them all labelled and then montage them. You can also control the width, in terms of number of images per line, more easily:

#!/bin/bash
number=0
for f in *.tif; do
   convert "$f" -gravity northwest -annotate +0+0 "$number" miff:-
   ((number++))
done | montage -tile x3 - result.png

enter image description here

It takes advantage of ImageMagick miff format, which means Multiple Image File Format, to concatenate all the output images and send them into the stdin of the montage command.

Or, you can change the script like this:

#!/bin/bash
number=0
for f in *.tif; do
   convert "$f" -gravity northwest -fill white -annotate +0+0 "$number" miff:-
   ((number++))
done | montage -tile 2x - result.png

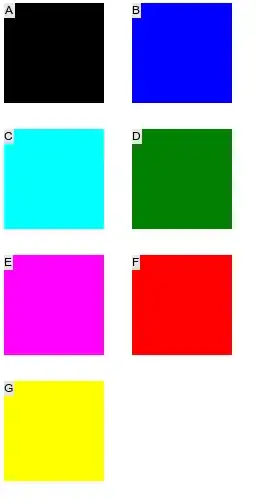
to get

enter image description here

Or maybe this...

#!/bin/bash
number=0
for f in *.tif; do
   convert "$f" -gravity northwest -background gray90 label:"$number" -composite miff:-
   ((number++))
done | montage -tile 2x - result.png

enter image description here

Or with letters...

#!/bin/bash
number=0
letters="ABCDEFGHIJKLMNOPQRSTUVWXYZ"
for f in *.tif; do
   label=${letters:number:1}
   convert "$f" -gravity northwest -background gray90 label:"$label" -composite miff:-
   ((number++))
done | montage -tile 2x - result.png

enter image description here

Mark Setchell
  • 191,897
  • 31
  • 273
  • 432
  • Yes, your answer really helped me. Thank you very much for the detailed description. Using the for-loop with the -composite miff:- is really great. I couldn't figure out two thing though: 1) if I completely leave -backround it makes the background whit (same result as -background white) is there any way not to use any background field? 2) How can I set the font to eg Times New Roman? -font Times New Roman doesn't work, neighter does -font Times\ New\ Roman my command looks like this: convert "$i" -gravity northwest -pointsize 120 label:"$label" -composite miff:- – Mojo Dodo Jul 10 '15 at 17:19
  • Try `-background none` – Mark Setchell Jul 14 '15 at 08:15
  • Thank you! `-background none` works, but unfortunately `-font TimeNewRoman` doesn't. Btw: I'm working on Ubuntu 14.04 (Times New Roman is installed) – Mojo Dodo Jul 14 '15 at 16:38
  • Try running `identify -list font` and see in the first 2-3 lines where your font configuration file is, then see my other post here... http://stackoverflow.com/a/24701602/2836621 – Mark Setchell Jul 14 '15 at 16:40
  • how can I get this working when the images are different sizes? I mean, they are all square, but some 100x100, and some as large as 500x500. Using the above method gives me very small text on the 500x500 images – cannyboy Feb 14 '22 at 20:30
  • @cannyboy Please ask a new question where you will get a better audience and bear in mind that things have moved on in 7 years. – Mark Setchell Feb 14 '22 at 20:34
  • @MarkSetchell - well, I did it by piping a resized image in like so `convert "$f" -resize 1000x1000 jpg:- | convert - -gravity etc etc` – cannyboy Feb 15 '22 at 12:59
2

What possibilities are there to label the single images in the combined?

Iterate with a for loop.

for INDEX in {A,B,C}; do
    convert ${INDEX}.jpg labeled_${INDEX}.jpg
done

Is there an option to put the label not underneath the picture but eg in the upper left or lower right corner?

Try using the -annotate with -gravity

convert rose: -fill white \
        -gravity NorthWest -annotate +0+0 "A" \
        A.png

A rose

convert rose: -fill white \
        -gravity SouthEast -annotate +0+0 "B" \
        B.png

Rose B

emcconville
  • 23,800
  • 4
  • 50
  • 66
1

Based on the answers above, I wrote a small perl script to combine figures into labelled subfigures, which might be useful to others. It works for me on a Mac, but I didn't really test it.

Usage: pics2grid geometry output_file [-title title] [-bycols] input_files

where the geometry format is [# cols]x[# rows] and input_files accept wild cards. If your title contains spaces, the title must be quoted and the spaces escaped.

I paste it below, but it can also be downloaded from http://endress.org/progs.html#subfigs

#!/usr/bin/perl -l

use strict;
use warnings;
use autodie;
use Getopt::Long 'HelpMessage';

### Process options and arguments ###
if (@ARGV < 3){
  HelpMessage(1);
}

if (($ARGV[0] !~ /^\d+x/) && ($ARGV[0] !~ /x\d+$/)){
  HelpMessage(1);
}

my $geometry = shift @ARGV;

my $output_file = shift @ARGV;

my $title = "";
my $bycols = "";

GetOptions ('bycols' => \$bycols,
        'title=s' => \$title,
        'help'     =>   sub { HelpMessage() },
       ) or HelpMessage(1);


# Wildcards are automatically expanded in @ARGV, but just make sure that they are
my @input_files = map { glob } @ARGV;

$title = "-title $title"
  if ($title);

if ($bycols){
  die "When option -bycols is set, a fully specified geometry is needed."
    unless ($geometry =~ /^\d+x\d+$/);
 }


 @input_files = reorder_input_files (\@input_files, $geometry)
   if ($bycols);

### Define the labels for the subfigures. If you want different figures, change it here. ###
my @labels = "a".."z";
@labels = @labels[0..$#input_files];
@labels = reorder_input_files (\@labels, $geometry)
   if ($bycols);


my $pic_data;

foreach my $f (@input_files){
  # Pictures are combined by rows
  my $lab = shift @labels;
  $pic_data .= `convert \"$f\" -pointsize 48 -font Arial-Regular -gravity northwest -annotate +20+10 \'$lab\' \\
                -bordercolor black -border 1 \\
                 miff:-`;

}

open (OUT,  "| montage -tile $geometry -geometry +0+0 -background white -pointsize 60 -font Arial-Regular $title - $output_file");
print OUT $pic_data;
close (OUT);

sub reorder_input_files {

  my ($input_files, $geometry) = @_;

  my ($ncols, $nrows) = split (/x/, $geometry);

  my @rows = ([]) x $nrows;

  foreach my $i (0..$#$input_files){

    my @tmp_array = @{$rows[$i % $nrows]};
    push (@tmp_array, $input_files->[$i]);
    $rows[$i % $nrows] = \@tmp_array;

  }

  my @reordered_files = ();

  map {push (@reordered_files, @$_)} @rows;

  return (@reordered_files);

}

=head1 NAME

pics2grid - arrange pictures on a grid of sub-figures and number the individual pictures with letters

=head1 SYNOPSIS

  pics2grid geometry output [-title title] [-bycols] inputfiles

  The inputfiles argument accepts wild cards.

  Geometry format: [\# cols]x[\# rows]. 
                   Unless you set the option -bycols, specifying either 
                   the number of rows or of columns is sufficient. 

  Options:
    --title,-t      Title. If your title contains spaces, the title needs 
                    to be quoted *and* the spaces need to be escaped. 
    --bycols,-b     Arrange and number pictures by columns rather than rows
    --geometry,-g   Not yet implemented
    --help,-h       Print this help message

  Examples:
    # Create grid with 3 columns and 2 rows in which images are arranged by *rows*
    pics2grid.pl 3x2 output.pdf input1.png input2.png input3.png\
                                input4.png input5.png input6.png

    # Create grid with 2 columns and 3 rows in which images are arranged by *columns*
    pics2grid.pl 2x3 output.pdf -bycols input1.png input2.png input3.png\
                                        input4.png input5.png input6.png

    # Same as above but with a title including spaces. 
    # Note that the title needs to be quoted *and* the space needs to be escaped 
    # (i.e., put \ in front of the space)
    pics2grid.pl 2x3 output.pdf -bycols -title "My\ title" input1.png\
                 input2.png input3.png input4.png input5.png input6.png

    # Create grid with 4 columns of all png files in the current directory. Images 
    # are arranged by *columns*.
    # It will stop labeling the subfigures for more than 26 images
    pics2grid.pl 4x output.pdf *.png

=head1 VERSION

0.01

=cut
ade
  • 146
  • 1
  • 3