1

I have tried this code.

import sys
import numpy as np
sys.path.append('/usr/local/lib/python2.7/site-packages')
import cv2
from cv2.cv import *
img=cv2.imread("test2.jpg",cv2.IMREAD_COLOR)
gimg = cv2.imread("test2.jpg",cv2.IMREAD_GRAYSCALE)
b,g,r = cv2.split(img)
ret,thresh1 = cv2.threshold(gimg,127,255,cv2.THRESH_BINARY);
numrows = len(thresh1)    
numcols = len(thresh1[0])
thresh = 170
im_bw = cv2.threshold(gimg, thresh, 255, cv2.THRESH_BINARY)[1]
trig=0
trigmax=0;
xmax=0
ymax=0
for x in range(0,numrows):
for y in range(0,numcols):
    if(im_bw[x][y]==1):
        trig=trig+1;
if(trig>5):
    xmax=x;
    ymax=y;
    break;
print x,y,numrows,numcols,trig
roi=gimg[xmax:xmax+200,ymax-500:ymax]
cv2.imshow("roi",roi)
WaitKey(0)

here test2.jpg is what I am tring to do is to concentrate on the high intensity part of the image(i.e the circle with high intensity in image).But my code does not seem to do so. Can anyone help?

3 Answers3

1

Try checking whether a pixel is not zero - it turns out those pixels have a value of 255 after thresholding, as it is a grayscale image after all.

The threshold seems to be wrong also, but I don't really know what you want to see (display it with imshow - it isn't just the circle). And your code matches the number '3' in the bottom left corner, therefore the ROI matrix indices are invalid in your example.

EDIT:

After playing around with the image, I ended up using a different approach. I used the SimpleBlobDetector and did an erosion on the image before, so the region you're interested in remains connected. For the blob detector the program inverts the image first. (You may want to read a SimpleBlobDetector tutorial as I did, parts of the code are based on that page - many thanks to the author!)

The following code displays the procedure step by step:

import cv2
import numpy as np

# Read image
gimg = cv2.imread("test2.jpg", cv2.IMREAD_GRAYSCALE)

# Invert the image
im_inv = 255 - gimg
cv2.imshow("Step 1 - inverted image", im_inv)
cv2.waitKey(0)

# display at a threshold level of 50
thresh = 45
im_bw = cv2.threshold(im_inv, thresh, 255, cv2.THRESH_BINARY)[1]

cv2.imshow("Step 2 - bw threshold", im_bw)
cv2.waitKey(0)

# erosion
kernel = cv2.getStructuringElement(cv2.MORPH_ELLIPSE,(10,10))
im_bw = cv2.erode(im_bw, kernel, iterations = 1)

cv2.imshow('Step 3 - erosion connects disconnected parts', im_bw)
cv2.waitKey(0)

# Set up the detector with default parameters.
params = cv2.SimpleBlobDetector_Params()
params.filterByInertia = False
params.filterByConvexity = False
params.filterByCircularity = False
params.filterByColor = False
params.minThreshold = 0
params.maxThreshold = 50
params.filterByArea = True

params.minArea = 1000    # you may check with 10 --> finds number '3' also
params.maxArea = 100000 #im_bw.shape[0] * im_bw.shape[1] # max limit: image size

# Create a detector with the parameters
ver = (cv2.__version__).split('.')
if int(ver[0]) < 3 :
    detector = cv2.SimpleBlobDetector(params)
else : 
    detector = cv2.SimpleBlobDetector_create(params)

# Detect blobs.
keypoints = detector.detect(im_bw)
print "Found", len(keypoints), "blobs:"
for kpt in keypoints:
    print "(%.1f, %.1f) diameter: %.1f" % (kpt.pt[0], kpt.pt[1], kpt.size)

# Draw detected blobs as red circles.
# cv2.DRAW_MATCHES_FLAGS_DRAW_RICH_KEYPOINTS ensures the size of the 
# circle corresponds to the size of blob
im_with_keypoints = cv2.drawKeypoints(gimg, keypoints, np.array([]), (0,0,255), 
    cv2.DRAW_MATCHES_FLAGS_DRAW_RICH_KEYPOINTS)

# Show keypoints
cv2.imshow("Keypoints", im_with_keypoints)
cv2.waitKey(0)

This algorithm finds the coordinate (454, 377) as the center of the blob, but if you reduce the minArea to e.g. 10 then it will find the number 3 in the bottom corner as well.
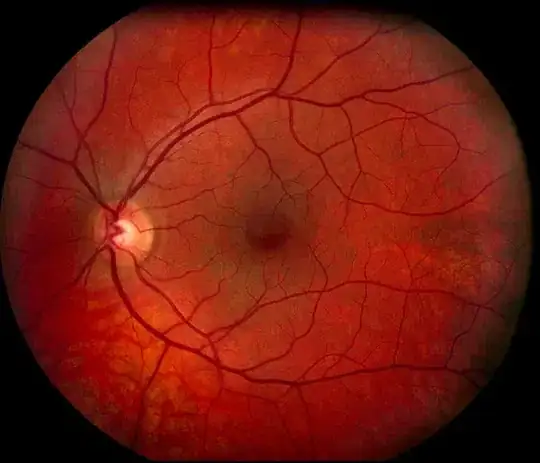
Andris
  • 921
  • 7
  • 14
  • I tried with non-zero but no luck.What I am trying to concentrate on is this[link](http://tinypic.com/r/vqr4w7/8) .If I take that thresh only then my concentrated region will be in white colour and other regions will be in black colour.So I was thinking that the white regions value will be 1 and the dark regions value will be 0.Can you tell Where I am wrong? – Giritheja Sreenivasulu May 28 '15 at 04:47
  • @SGiritheja The white regions have a value of 255 in your grayscale image (after threshold) so comparing with 1 instead of 255 is wrong. And if you check pixels in the order you wrote in your example, you'll locate the number '3' in the bottom part of the image. I suggest displaying im_bw first to see what you work on. – Andris Jun 02 '15 at 12:00
  • I tried the program in my computer and the program showed me that it found zero blobs and exited. – Giritheja Sreenivasulu Jun 03 '15 at 12:16
  • Can you show me the region of interest in the different steps running the original test2.jpg? For me [here they are](http://i59.tinypic.com/2qa2w5j.jpg) copied together for simplicity. (You may see the diameter supplied by the blob detector is not proper.) – Andris Jun 03 '15 at 15:29
  • After running different steps on original test2.jpg I got [this](http://tinypic.com/a/43sw2/4). – Giritheja Sreenivasulu Jun 04 '15 at 05:26
  • 1
    (I think it isn't the same image you linked in your original question.) Reducing the minArea limit or changing threshold fixes it for that image, but your solution seems to be more robust and straightforward. Can you extend the question title with "...of highest intensity part"? I did not even realize it was there in the last sentence... – Andris Jun 04 '15 at 09:15
  • Ohhh! my bad I belive there was some kind renaming the file issues and I should have had a better question title.I will take care this mistakes and hopefully wont happen in future questions.Anyway Thank you for your help. – Giritheja Sreenivasulu Jun 04 '15 at 09:25
1

I found answer to my question from here

here is my code

# import the necessary packages
  import numpy as np
  import cv2
# load the image and convert it to grayscale
 image = cv2.imread('test2.jpg')
 orig = image.copy()
 gray = cv2.cvtColor(image, cv2.COLOR_BGR2GRAY)
# apply a Gaussian blur to the image then find the brightest
# region
gray = cv2.GaussianBlur(gray, (41, 41), 0)
(minVal, maxVal, minLoc, maxLoc) = cv2.minMaxLoc(gray)
image = orig.copy()
roi=image[maxLoc[1]-250:maxLoc[1]+250,maxLoc[0]-250:maxLoc[0]+250,2:2] 
cv2.imshow("Robust", roi)
cv2.waitKey(0)

test2.jpg test2.jpg

Roi

ROI

0

I was working with something similar but I encounter a few problems using the above answer. There are a few problems using the proposed cropping:

image[maxLoc[1]-250:maxLoc[1]+250,maxLoc[0]-250:maxLoc[0]+250] 

because the index with the maximum intensity value can be in the edge of the image. Therefore the -250 or +250 might go out of the index of the image shape. If you want to generalize probably this would be a better option:

img = imread("YourImage.png")
idx_max = np.unravel_index(img.argmax(), img.shape)
size = 250

if idx_max[0] - size <= 0:
    start0 = 0
    end0 = size + (size - idx_max[0])
elif idx_max[0] + size > img.shape[0]:
    start0 = idx_max[0] - ((2*size) - (img.shape[0] - idx_max[0])) 
    end0 = img.shape[0] - 1
else:
    start0 = idx_max[0] - size
    end0 = idx_max[0] + size


if idx_max[1] - size <= 0:
    start1 = 0
    end1 = size + (size - idx_max[1])
elif idx_max[1] + size > im.shape[1]:
    start0 = idx_max[1] - ((2*size) - (img.shape[1] - idx_max[1])) 
    end0 = img.shape[1] - 1
else:
    start1 = idx_max[1] - size
    end1 = idx_max[1] + size

ROI = img[start0:end0, start1:end1]

I hope this helps :)

Mohammet
  • 13
  • 2