We start by drawing the shape we want on canvas.
This shape may be anything. It may be text, it may be a shape in an image - the non-transparent part of a .png with transparency, the non-black or the black part of a .jpg image - it doesn't really matter, all of these work.
Let's start with the very simple case where the shape is text.
We're going to have a few constants (the canvas, the context, the number of RGBA channels, a text box object which starts out with just the string we want to dottify, the dot grid for which we define the dot radius and the distance between two consecutive dots on the same row/ column):
const _C = document.getElementById('c'),
      CT = _C.getContext('2d'),
      TEXT_BOX = { str: 'HELLO!' },
      DOT_GRID = { gap: 6 },
      NUM_CH = 'RGBA'.length;
We set canvas dimensions and then we compute a few things about the text so that it nicely fits in the middle of the canvas. Not all letters are going to need a square box, some (like 'I') are much narrower, but we can start from such an assumption to get the height of our text box, which we also store in the text box object and set as the font size:
TEXT_BOX.height = Math.min(.7*_C.height, _C.width/TEXT_BOX.str.length);
CT.font = `600 ${TEXT_BOX.height}px arial black, sans serif`;
CT.letterSpacing = '8px';
We've also spaced out the letters a bit.
We then measure the text with this font size and letter spacing in order to get the actual text box width. We also compute the coordinates of the top left corner (we'll be using these when dottifying the text).
TEXT_BOX.width = CT.measureText(TEXT_BOX.str).width;
TEXT_BOX.x = .5*(_C.width - TEXT_BOX.width);
TEXT_BOX.y = .5*(_C.height - TEXT_BOX.height);
We give the text a custom fill style (this is totally optional and only really needed if you plan on leaving the text visible underneath the grid of dots) and middle align it along both its own vertical and horizontal axes.
CT.fillStyle = 'purple';
CT.textAlign = 'center';
CT.textBaseline = 'middle';
Now we can actually draw our text on the canvas:
CT.fillText(TEXT_BOX.str, .5*_C.width, .5*_C.height);
Now comes the interesting part - we dottify the text!
We start out by getting the canvas image data for the text box rectangle.
let data = CT.getImageData(TEXT_BOX.x, TEXT_BOX.y,
                           TEXT_BOX.width, TEXT_BOX.height).data;
This gives us a very long 1D array with the RGBA values of all the pixels within the text box rectangle, row by row, column by column.
/* 1st row, 1st column: */
R0, G0, B0, A0,
/* 1st row, 2nd column: */
R1, G1, B1, A1,
...
/* last row, last column: */
RN, GN, BN, AN
We then turn this array into a an array of pixel objects, each pixel object containing the x,y coordinates of each pixel and the RGBA channel values as an array. We then filter out all pixels where the alpha is 0 (outside the text shape) and which aren't grid nodes for a grid of dots with the given gap. This basically gives us the array of dots we want to draw within the text shape.
DOT_GRID.arr =
  data.reduce((a, c, i, o) => {
    if(i%NUM_CH === 0)
      a.push({
        x: (i/NUM_CH)%TEXT_BOX.width + TEXT_BOX.x,
        y: Math.floor(i/NUM_CH/TEXT_BOX.width) + TEXT_BOX.y,
        rgba: o.slice(i, i + NUM_CH)
      });
    return a
  }, []).filter(c => c.rgba[NUM_CH - 1] &&
                     !(Math.ceil(c.x - .5*DOT_GRID.gap)%DOT_GRID.gap) &&
                     !(Math.ceil(c.y - .5*DOT_GRID.gap)%DOT_GRID.gap));
We can remove the text underneath the dots if we want to.
CT.clearRect(TEXT_BOX.x, TEXT_BOX.y, TEXT_BOX.width, TEXT_BOX.height);
We then draw the dots, let's say with a gold fill.
CT.fillStyle = 'gold'

CT.beginPath();

DOT_GRID.arr.forEach(c => {
  CT.moveTo(c.x, c.y);
  CT.arc(c.x, c.y, DOT_GRID.rad, 0, 2*Math.PI)
});

CT.closePath();
CT.fill();
One thing that I would like to point out here is that fills are computationally expensive, so in this case, where all dots have the same fill style, we are keeping fill() outside the forEach loop, so it only gets called once at the end.
In general, if something doesn't need to depend on the loop variable or to be randomly generated with each iteration, keep it out of the loop!
This is what the dottified result looks like with the original text written underneath:

... and without:

And that's pretty much it for the very basic dottifying text case.
Here's a working snippet of the very basic case explained above.
const _C = document.getElementById('c'),
      CT = _C.getContext('2d'),
      TEXT_BOX = { str: 'HELLO!' },
      DOT_GRID = { rad: 2, gap: 6 },
      NUM_CH = 'RGBA'.length;

DOT_GRID.draw = function() {
  CT.fillStyle = 'gold';
  CT.beginPath();
  DOT_GRID.arr.forEach(c => {
    CT.moveTo(c.x, c.y);
    CT.arc(c.x, c.y, DOT_GRID.rad, 0, 2*Math.PI)
  });
  CT.closePath();
  CT.fill();
}

function dottify() {
  let data = CT.getImageData(TEXT_BOX.x, TEXT_BOX.y,
                             TEXT_BOX.width, TEXT_BOX.height).data;
  DOT_GRID.arr =
    data.reduce((a, c, i, o) => {
      if(i%NUM_CH === 0)
        a.push({
          x: (i/NUM_CH)%TEXT_BOX.width + TEXT_BOX.x,
          y: Math.floor(i/NUM_CH/TEXT_BOX.width) + TEXT_BOX.y,
          rgba: o.slice(i, i + NUM_CH)
        });
      return a
    }, []).filter(c => c.rgba[NUM_CH - 1] &&
                       !(Math.ceil(c.x - .5*DOT_GRID.gap)%DOT_GRID.gap) &&
                       !(Math.ceil(c.y - .5*DOT_GRID.gap)%DOT_GRID.gap));
  /* remove text... if you want to *
  CT.clearRect(TEXT_BOX.x, TEXT_BOX.y, TEXT_BOX.width, TEXT_BOX.height);
  /**/
  DOT_GRID.draw();
}

function write() {
  TEXT_BOX.height = Math.min(.7*_C.height, _C.width/TEXT_BOX.str.length);
  CT.font = `600 ${TEXT_BOX.height}px arial black, sans serif`;
  CT.letterSpacing = '8px';
  TEXT_BOX.width = Math.ceil(CT.measureText(TEXT_BOX.str).width);
  TEXT_BOX.x = Math.floor(.5*(_C.width - TEXT_BOX.width));
  TEXT_BOX.y = Math.floor(.5*(_C.height - TEXT_BOX.height));
  CT.textAlign = 'center';
  CT.textBaseline = 'middle';
  CT.fillStyle = 'purple';
  CT.fillText(TEXT_BOX.str, .5*_C.width, .5*_C.height);
  dottify();
}

(_ => {
  let s = getComputedStyle(_C);
  _C.width = +s.width.slice(0, -2);
  _C.height = +s.height.slice(0, -2);
  write();
})();
html, body { display: grid }

html { height: 100% }

body { background: #121212 }

canvas { width: 100%; height: 100%; }
<canvas id='c'></canvas>
And here's a heavily commented version that also nicely handles page resize.
Of course, we can also give the text a gradient fill and then use the gradient-generated RGB pixel values for the dots on our grid. Which can also have different radii, a random component to their position and a motion depending on that of the pointer, like in this example (note that in this case I cleared the original text drawn on the canvas).
It works in a very similar manner for images. We draw the images on canvas, read the image data, decide on which pixels we want to exclude (maybe transparent, maybe black, maybe white... it doesn't matter) and then only keep the grid node pixels not excluded at the previous step.
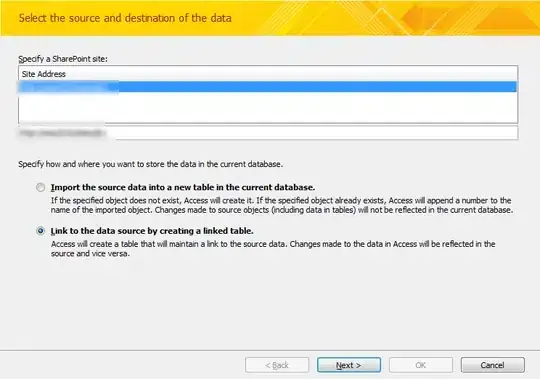
Let's say we have this cat image (.png with transparency). We exclude the transparent pixels and then exclude all pixels that are not grid nodes.
We can use a Base64 image source to avoid CORS issues. There are plenty of websites that can do the conversion (for example this one).
We copy it and set it to a BASE64_SRC constant.
The constants are pretty much the same, it's just TEXT_BOX that gets replaced with IMG_RECT:
const IMG_RECT = { img: new Image() }
Once we've set canvas dimensions, we don't write the text on the canvas, but instead proceed to painting the image.
We set the image source to the Base64 one.
IMG_RECT.img.src = BASE64_SRC;
Once it has loaded, we proceed to getting its aspect ratio out of its dimensions. Then we get the dimensions and the top left corner of the box we draw our image in such that it fits within the canvas. And then we actually draw the image within this rectangle.
IMG_RECT.img.onload = function() {
  IMG_RECT.ratio = IMG_RECT.img.width/IMG_RECT.img.height;
  IMG_RECT.width =
    Math.min(IMG_RECT.img.width, _C.width, _C.height*IMG_RECT.ratio);
  IMG_RECT.height =
    Math.min(IMG_RECT.img.height, _C.height, _C.width/IMG_RECT.ratio);
  IMG_RECT.x = .5*(_C.width - IMG_RECT.width);
  IMG_RECT.y = .5*(_C.height - IMG_RECT.height);

  CT.drawImage(IMG_RECT.img, IMG_RECT.x, IMG_RECT.y,
                             IMG_RECT.width, IMG_RECT.height);
}
The dottifying part is exactly the same as before, we just replace all occurrences of TEXT_BOX with IMG_RECT. And thus we have the dottified cat:

Just like in the case of the text, we can remove the original shape from underneath the dots:
Here's a heavily commented demo showing this in action.
We don't really have to Base64 our image. We can do this instead:
const IMG_RECT = {
  img: new Image(),
  src: 'https://i.stack.imgur.com/KleBk.png'
}
And then...
IMG_RECT.img.crossOrigin = 'annonymous';
IMG_RECT.img.src = IMG_RECT.src;
Here's the live demo with this CORS setting in action.
We also don't necessarily need an image with transparency. We could also use an image like this one, where the dark shape of the ballet dancer contrasts strongly with the background.
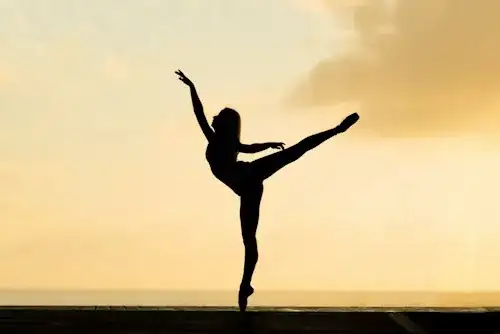
In this case, we need to change the first filter condition. We don't need the alpha (fourth) channel to be non-zero, but rather all the other channels (RGB, the first three) to all be pretty low values (I suppose summing them would also do the trick in this particular case):
Math.max(...c.rgba.slice(0, 3)) < 36
This pretty much does it (live demo):
Works the same way for this palm tree image:
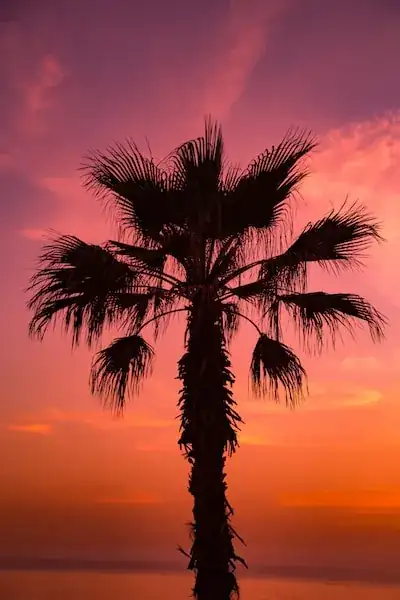
Dottified version (live demo):

We can also go the other way and dottify what's not dark in an image:
In this case in particular, we can just focus on the blue (third) channel and use the following filter condition:
c.rgba[2] > 200
Live demo.
Just like in the case of the gradient text, we can also use the RGB values from the original image for the dottified version.
Let's say we start from this image:

Dottifying it to preserve the RGB channels gives us this (live demo):
This demo (note it's almost a decade old, JS got better and hopefully so did I... in any case, that code could be improved) uses a similar technique to turn an image into a grid of tiles which then collapse.