How can I add 2 buttons into the UINavigationBar without XIB?
The 2 buttons should be aligned on the right side of the UINavigationBar.
I know how I can add one button, but how about two?
How can I add 2 buttons into the UINavigationBar without XIB?
The 2 buttons should be aligned on the right side of the UINavigationBar.
I know how I can add one button, but how about two?
With iOS 5+ it's as easy as:
UIBarButtonItem *btnShare = [[UIBarButtonItem alloc] initWithBarButtonSystemItem:UIBarButtonSystemItemAction target:self action:@selector(share)];
UIBarButtonItem *btnRefresh = [[UIBarButtonItem alloc] initWithBarButtonSystemItem:UIBarButtonSystemItemRefresh target:self action:@selector(refresh)];
[self.navigationItem setRightBarButtonItems:[NSArray arrayWithObjects:btnShare, btnRefresh, nil]];
I posted code (see below) to add two buttons to the right of the navigationBar. You can set barStyle = -1 instead of subclassing UIToolbar.
UIToolbar *tools = [[UIToolbar alloc]
                    initWithFrame:CGRectMake(0.0f, 0.0f, 103.0f, 44.01f)]; // 44.01 shifts it up 1px for some reason
tools.clearsContextBeforeDrawing = NO;
tools.clipsToBounds = NO;
tools.tintColor = [UIColor colorWithWhite:0.305f alpha:0.0f]; // closest I could get by eye to black, translucent style.
                                                              // anyone know how to get it perfect?
tools.barStyle = -1; // clear background
NSMutableArray *buttons = [[NSMutableArray alloc] initWithCapacity:3];

// Create a standard refresh button.
UIBarButtonItem *bi = [[UIBarButtonItem alloc]
    initWithBarButtonSystemItem:UIBarButtonSystemItemRefresh target:self action:@selector(refresh:)];
[buttons addObject:bi];
[bi release];

// Create a spacer.
bi = [[UIBarButtonItem alloc] initWithBarButtonSystemItem:UIBarButtonSystemItemFixedSpace target:nil action:nil];
bi.width = 12.0f;
[buttons addObject:bi];
[bi release];

// Add profile button.
bi = [[UIBarButtonItem alloc] initWithTitle:@"Profile" style:UIBarButtonItemStylePlain target:self action:@selector(goToProfile)];
bi.style = UIBarButtonItemStyleBordered;
[buttons addObject:bi];
[bi release];

// Add buttons to toolbar and toolbar to nav bar.
[tools setItems:buttons animated:NO];
[buttons release];
UIBarButtonItem *twoButtons = [[UIBarButtonItem alloc] initWithCustomView:tools];
[tools release];
self.navigationItem.rightBarButtonItem = twoButtons;
[twoButtons release];
You can use a bar button initialized with a toolbar as a custom view.
UIToolbar* toolbar = [[UIToolbar alloc] initWithFrame:CGRectMake(0.0f, 0.0f, 103.0f, 44.01f)];
NSArray* buttons = [NSArray arrayWithObjects:self.editButtonItem, someOtherButton, nil];
[toolbar setItems:buttons animated:NO];
self.navigationItem.rightBarButtonItem = [[UIBarButtonItem alloc] initWithCustomView:toolbar];
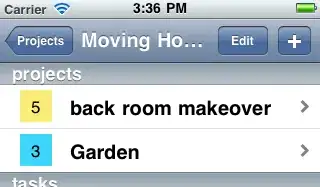
Would give something like this:
Note: This answer is obsolete for iOS 6 or later
Here is the working example from my current project:
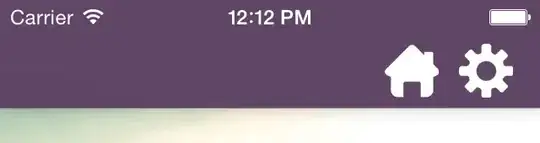
UIButton *homeBtn =  [UIButton buttonWithType:UIButtonTypeCustom];
[homeBtn setImage:[UIImage imageNamed:@"home-icon"] forState:UIControlStateNormal];
//[homeBtn addTarget:self action:@selector(home) forControlEvents:UIControlEventTouchUpInside];
[homeBtn setFrame:CGRectMake(0, 0, 32, 32)];

UIButton *settingsBtn =  [UIButton buttonWithType:UIButtonTypeCustom];
[settingsBtn setImage:[UIImage imageNamed:@"settings-icon"] forState:UIControlStateNormal];
//[settingsBtn addTarget:self action:@selector(settings) forControlEvents:UIControlEventTouchUpInside];
[settingsBtn setFrame:CGRectMake(44, 0, 32, 32)];

UIView *rightBarButtonItems = [[UIView alloc] initWithFrame:CGRectMake(0, 0, 76, 32)];
[rightBarButtonItems addSubview:homeBtn];
[rightBarButtonItems addSubview:settingsBtn];

self.navigationItem.rightBarButtonItem = [[UIBarButtonItem alloc] initWithCustomView:rightBarButtonItems];
UINavigationBar *navBarView = [[UINavigationBar alloc] initWithFrame: CGRectMake(0.0f, 0.0f, 320.0f, 42.0f)];
    navBarView.tintColor= [UIColor colorWithRed:90.0/255.0f green:53.0/255.0f blue:45.0/255.0f alpha:1.0];

    UIBarButtonItem *left=[[UIBarButtonItem alloc]initWithTitle:@"Back" style:UIBarButtonItemStylePlain target:self action:@selector(backView)];
    UIBarButtonItem *right=[[UIBarButtonItem alloc]initWithTitle:@"Save" style:UIBarButtonItemStylePlain target:self action:@selector(SaveImage)];
    UIBarButtonItem *Add=[[UIBarButtonItem alloc]initWithBarButtonSystemItem:UIBarButtonSystemItemAdd target:self action:@selector(AddComment:)];

    UINavigationItem *navigationItem = [[UINavigationItem alloc] init];
    navigationItem.leftBarButtonItem = left;
    NSMutableArray *buttonArray=[[NSMutableArray alloc]initWithCapacity:2];
    [buttonArray addObject:right];
    [buttonArray addObject:Add];
    navigationItem.rightBarButtonItems = buttonArray;
    [navBarView pushNavigationItem:navigationItem animated:NO];
[self.view addSubView:navBarView];
Swift:
override func viewDidLoad() {
    super.viewDidLoad()

    // Additional bar button items
    let button1 = UIBarButtonItem(image: UIImage(named: "image1.png"), style: .Plain, target: self, action: "methodA")
    let button2 = UIBarButtonItem(image: UIImage(named: "image2.png"), style: .Plain, target: self, action: "methodB")
    let button3 = UIBarButtonItem(image: UIImage(named: "image3.png"), style: .Plain, target: self, action: "methodC")

    navigationItem.leftItemsSupplementBackButton = true
    navigationItem.setLeftBarButtonItem(button1, animated: true)
    navigationItem.setRightBarButtonItems([button2, button3], animated: true)
Methods for buttons:
func methodA() {
    performSegueWithIdentifier("segA", sender: nil)
}

func methodB() {
    performSegueWithIdentifier("segB", sender: nil)
}

func methodC() {
    performSegueWithIdentifier("segC", sender: nil)
}
You can do in Swift like this
var editImg   : UIImage = UIImage(named: "plus")!
var searchImg : UIImage = UIImage(named: "search")!

var editBtn : UIBarButtonItem = UIBarButtonItem(image: editImg,  style: UIBarButtonItemStyle.Plain, target: self, action: Selector("editBtnPressed:"))

var searchBtn : UIBarButtonItem = UIBarButtonItem(image: searchImg,  style: UIBarButtonItemStyle.Plain, target: self, action: Selector ("searchBtnPressed:"))

var buttons : NSArray = [editBtn, searchBtn]

self.navigationItem.rightBarButtonItems = buttons

func editBtnPressed(sender: AnyObject){

}

func searchBtnPressed(sender: AnyObject){

}
You can create a UIView and add two buttons in that view. And add that UIView as right button :)
UIView* rightItem = [UIView alloc] initWithFrame:frame];
//Create UIButton1 b1
//Create UIButton2 b2
[rightItem addSubview:b1];
[rightItem addSubview:b2];

self.navigationItem.rightBarButtonItem = rightItem;
Prakash response also work in interface builder.
Drag a UIView in the UINavigationItem, then you can put several UIButton as children of this UIView and create a hierarchy like so :
Set the background color of the UIView to clear and add some constraints to center vertically the buttons and fix the horizontal position. Here is the result I got with zero line of code:
In SWIFT, you can add this code to set up two buttons on the right (or left) side:
self.navigationItem.rightBarButtonItems = [UIBarButtonItem(barButtonSystemItem: UIBarButtonSystemItem.Action, target: self, action: "barButtonItemClicked"), UIBarButtonItem(barButtonSystemItem: UIBarButtonSystemItem.Search, target: self, action: "barButtonItemClicked")]
From iOS 5 onwards, it is easy to achieve. UINavigationItem has the ability to have multiple buttons in left and right side of the bar.
Here Is the Swift 4 code:
    let editImage   = UIImage(named: "plus")!
    let searchImage = UIImage(named: "search")!
    let editButton   = UIBarButtonItem(image: editImage,  style: .plain, target: self, action:#selector(didTapEditButton))
    let searchButton = UIBarButtonItem(image: searchImage,  style: .plain, target: self, action:#selector(didTapSearchButton))
    navigationItem.rightBarButtonItems = [editButton, searchButton]


 @objc func didTapEditButton(sender: AnyObject){

  }

 @objc func didTapSearchButton(sender: AnyObject){

  }
You don´t have to add two buttons. You just need to add
UIBarButtonSystemItemFlexibleSpace
not
UIBarButtonSystemItemFixedSpace
and a button, so that it will be on right side.
Like this:
UIToolbar *toolbar = [[UIToolbar alloc] initWithFrame:CGRectMake(0, 0, 320, 40)];
toolbar.barStyle = UIBarStyleBlackTranslucent;

UIBarButtonItem *spaceButton = [[UIBarButtonItem alloc] initWithBarButtonSystemItem:UIBarButtonSystemItemFlexibleSpace target:nil action:nil];

UIBarButtonItem *infoButtonItem1 = [[UIBarButtonItem alloc] initWithTitle:@"Done" style:UIBarButtonItemStyleDone target:self action:@selector(empresaTextFieldDone)];

toolbar.items = [NSArray arrayWithObjects: spaceButton, infoButtonItem1, nil];
UIView* buttonsView= [[UIView alloc] initWithFrame:CGRectMake(10, 6, 84, 32)];
buttonsView.backgroundColor=[UIColor clearColor];

btn_back = [UIButton buttonWithType:UIButtonTypeCustom];
[btn_back addTarget:self action:@selector(backButtonClick)
forControlEvents:UIControlEventTouchUpInside];
btn_back.frame = CGRectMake(0, 0, 32, 32);
btn_back.backgroundColor=[UIColor colorWithPatternImage:[UIImage imageNamed:@"close.png"]];

btn_help = [UIButton buttonWithType:UIButtonTypeCustom];
[btn_help addTarget:self action:@selector(helpButtonClick)
 forControlEvents:UIControlEventTouchUpInside];
btn_help.frame = CGRectMake(42, 0, 32, 32);
btn_help.backgroundColor=[UIColor colorWithPatternImage:[UIImage imageNamed:@"info.png"]];

[buttonsView addSubview:btn_back];
[buttonsView addSubview:btn_help];

segmentItem = [[UIBarButtonItem alloc] initWithCustomView:buttonsView];
self.navigationItem.rightBarButtonItem = segmentItem;
In case someone comes here, like me, looking for a MonoTouch answer, look no further than NavigationItem.RightBarButtonItems array.
in SWIFT:
(suppose You have a nav. controller) in Root Controller use this code:
left: ..
    let leftBtn =  UIBarButtonItem(title: "Do It", style: UIBarButtonItemStyle.Plain,
        target: self, action: "doIt:")
    leftBtn.tag=100
    self.navigationItem.leftBarButtonItem = leftBtn
right:
    let rightView = UIView(frame:  CGRectMake(0, 0, 100, 30))
    rightView.backgroundColor = UIColor.redColor()

    let btn1 = UIButton(frame: CGRectMake(0,0,60, 20))
    btn1.setTitle("R1", forState: UIControlState.Normal)
    btn1.tag=101
    btn1.addTarget(self, action: "doIt:", forControlEvents: UIControlEvents.TouchUpInside)
    rightView.addSubview(btn1)

    let btn2 = UIButton(frame: CGRectMake(30,0,60, 20))
    btn2.setTitle("R2", forState: UIControlState.Normal)
    btn2.tag=102
    btn2.addTarget(self, action: "doIt:", forControlEvents: UIControlEvents.TouchUpInside)
    rightView.addSubview(btn2)


    let rightBtn = UIBarButtonItem(customView: rightView)
    self.navigationItem.rightBarButtonItem = rightBtn;
..
where:
 func doIt(sender: AnyObject!){
    let tag = sender.tag

}
    func makeCustomNavigationBar () {

        // Create the navigation bar
        let navigationBar = UINavigationBar(frame: CGRectMake(0, 20, self.view.frame.size.width, 44)) // Offset by 20 pixels vertically to take the status bar into account
        navigationBar.backgroundColor = UIColor.init(hexString: "E43037")
        navigationBar.delegate = self;

        navigationBar.setBackgroundImage(UIImage(), forBarMetrics: .Default)
        navigationBar.shadowImage = UIImage()
        navigationBar.translucent = true

        // Create a navigation item with a title
        let navigationItem = UINavigationItem()
        navigationBar.tintColor = UIColor.whiteColor()

        navigationItem.title = "Forgot Password"
        navigationBar.titleTextAttributes = [NSForegroundColorAttributeName : UIColor.whiteColor()]

        // Create left and right button for navigation item
        let leftButton = UIBarButtonItem(title: "", style: UIBarButtonItemStyle.Plain, target: self, action: nil)
        leftButton.action = "returnToLoginView"

        let backbuttonImageView =  UIImageView(frame: CGRectMake(0, 0, 30, 30))
        backbuttonImageView.image = UIImage(named: "nav-arrow-left")
        leftButton.image = backbuttonImageView.image
        navigationItem.leftBarButtonItem = leftButton


let rightButton = UIBarButtonItem(title: "Right", style: UIBarButtonItemStyle.Plain, target: self, action: nil)
        rightButton.action = "navigateToDashBoardView"

        let rightButtonImageView =  UIImageView(frame: CGRectMake(0, 0, 30, 30))
        rightButtonImageView.image = UIImage(named: "nav-arrow-left")
        rightButton.image = backbuttonImageView.image
        navigationItem.rightBarButtonItem = rightButton

        // Assign the navigation item to the navigation bar
        navigationBar.items = [navigationItem]

        // Make the navigation bar a subview of the current view controller
        self.view.addSubview(navigationBar)
    }