1

I'm working on a little program in python to estimate the direction of pointing gestures with 2D picture from a monocular camera and I'm using OpenCV 2.3. I know it's a bit tricky but I'm motivated! :) My approach is fisrt to use the face detection to detect an area into which I'm sure there is a lot of skin:

img = cv2.imread("/home/max/recordings/cameras/imageTEST.jpg",1)
img_hsv = cv2.cvtColor(img,cv2.COLOR_BGR2HSV)
hc1 = cv2.CascadeClassifier("/home/max/haarcascade_frontalface_alt.xml")
faces1 = hc1.detectMultiScale(img)
for (x,y,w,h) in faces1:
  cv2.rectangle(img, (x,y), (x+w,y+h), 255)
crop_img = img[y+2:y+w, x+2:x+h]

I really want to use this method because I want my detection to be robust to light variation. Then I compute the hue-saturation histogram of the picture of the detected face to make a back projection:

roihist = cv2.calcHist([crop_img],[0,1], None, [180, 256], [0, 180, 0, 256] )
dst = cv2.calcBackProject([img],[0,1],roihist,[0,180,0,256],1)

And finally I would be able to binarize the picture with a threshold and track the head and hands blobs to estimate the direction of pointing. I've no problem with my code but the skin is not detected... What am I doing wrong? Thx for your help!

Max

  • This might help you.. http://www.shervinemami.info/blobs.html – 2vision2 May 15 '13 at 12:44
  • Thx for the link! Unfortunately my detection is still poor even if I apply some threshold on S and V. It looks like the histogram of the ROI (ie the face) is not properly used for the back projection... – Maxime Cheramy May 15 '13 at 14:53

2 Answers2

0

Have you tried using the Cr channel from the YCbCr format? I had some luck with Cr when I had previously worked on hand detection using skin colour. Also, there is this paper, which uses a nice method for detecting hands. But keep in mind that as long as you use skin colour, the detection will not work for all hands, but can be tuned for a given user or a bunch of users.

Zaphod
  • 1,927
  • 11
  • 13
0

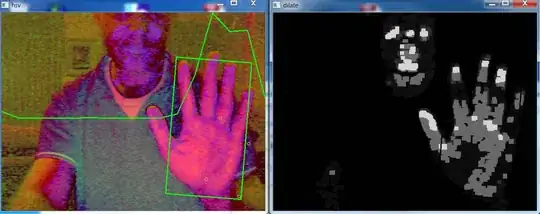
I've been working through the available opencv examples on the web lately (just the basic stuff for fun). I've moved of from the face recognition (interesting, but too black box for my liking) to manually selecting the roi in the HSV space, then using 'camshift' to track. I was still getting variable results I didn't understand so I also plot all the intermediate processing windows such as the hsv image and the backproject image, also graph the histogram across the windows. Suddenly all is clear - you can see exactly what the computer is trying to work with.

Here is my working code for python3.4, opencv3. You can manually select the skin. Credit mostly to other examples I've found on the web.

The 'cv2.calcBAckProject' function thresholds out the skin features nicely.

hsv and backproject

import numpy as np
import cv2

roiPts = []
track_mode = False
termination = (cv2.TERM_CRITERIA_EPS | cv2.TERM_CRITERIA_COUNT, 10, 1)
roiBox = None
kernel = np.ones((5, 5), np.uint8)
frame_width_in_px = 640
number_of_histogram_elements=16

def selectROI(event, x,y,flags,param):
    global track_mode, roiPts

    if (event == cv2.EVENT_LBUTTONDOWN) and (len(roiPts)==4): #reselecting ROI points so take out of tracking mode and empty current roipoints
        roiPts=[]
        track_mode = False
    if (event==cv2.EVENT_LBUTTONDOWN) and (len(roiPts) < 4): #ROI point selection
        roiPts.append([x, y])

cap = cv2.VideoCapture(0)
cv2.namedWindow("frame")
cv2.setMouseCallback("frame", selectROI)

while True:
    ret, frame = cap.read()

    if len(roiPts)<=4 and len(roiPts)>0:
        for x,y in roiPts:
            cv2.circle(frame, (x,y), 4, (0, 255, 0), 1)  # draw small circle for each roi click

    if len(roiPts)==4 and track_mode==False: #initialize the camshift
        # convert the selected points to a box shape
        roiBox = np.array(roiPts, dtype=np.int32)
        s = roiBox.sum(axis=1)
        tl = roiBox[np.argmin(s)]
        br = roiBox[np.argmax(s)]

        #extract the roi from the image and calculate the histograme
        roi = frame[tl[1]:br[1], tl[0]:br[0]]
        roi = cv2.cvtColor(roi, cv2.COLOR_BGR2HSV) #
        roiHist = cv2.calcHist([roi], [0], None, [number_of_histogram_elements], [0, 180])
        roiHist = cv2.normalize(roiHist, roiHist, 0, 255, cv2.NORM_MINMAX)
        roiBox = (tl[0], tl[1], br[0], br[1])
        track_mode = True #ready for camshift

    if track_mode == True: #tracking mode
        hsv = cv2.cvtColor(frame, cv2.COLOR_BGR2HSV)
        backProj = cv2.calcBackProject([hsv], [0], roiHist, [0, 180], 1)
        #perfrom some noise reduction and smoothing
        erosion = cv2.erode(backProj, kernel, iterations=2)
        dilate = cv2.dilate(erosion, kernel, iterations=2)
        (r, roiBox) = cv2.CamShift(dilate, roiBox, termination) #this takes prev roiBox and calculates the new roiBox
        pts = np.int0(cv2.boxPoints(r))
        cv2.polylines(frame, [pts], True, (0, 255, 0), 2) #tracking box
        cv2.polylines(backProj, [pts], True, (0, 255, 0), 2) #tracking box
        cv2.polylines(dilate, [pts], True, (0, 255, 0), 2) #tracking box
        cv2.polylines(hsv, [pts], True, (0, 255, 0), 2) #tracking box

        # plot histogram polyline across the windows
        x = np.linspace(0,640,number_of_histogram_elements,dtype=np.int32)
        y = roiHist.flatten().astype(np.int32, copy=False)-255 #note frame height needs to be greater than 255 which is the max histo value
        y=np.absolute(y)
        pts2 = np.stack((x, y), axis=1)
        cv2.polylines(frame, [pts2], False, (0, 255, 0), 2)
        cv2.polylines(hsv, [pts2], False, (0, 255, 0), 2)

        cv2.imshow("backproject", backProj)
        cv2.imshow("dilate", dilate)
        cv2.imshow("hsv", hsv)

    cv2.imshow("frame", frame)

    if cv2.waitKey(1) & 0xFF == ord('q'):
        break

# When everything done, release the capture
cap.release()
cv2.destroyAllWindows()
Ninga
  • 689
  • 7
  • 14