22

The sort of classic Springs and Struts, aka "Anchor and Align", or "Autosizing masks" is the only sort of resize-management I understand. However in XCode 4.6, "autolayout" using constraints as introduced in iOS 6, is the default, and it makes certain simple things harder, while making a whole world of new arrangements possible, once you learn how. (To be clear, some users might only care to get a simple view working without fighting autolayout battles, so a workaround was suggested early on by Matt, of turning off Autolayout, which is reproduced below)

iOS 6 Layout Constraints, the Interface Builder system of editing constraints, I do not understand.

enter image description here

Where XCode Interface Builder automatically creates constraints (such as at the edges of the view) it seems to behave in a way I understand.

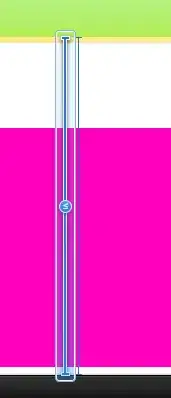
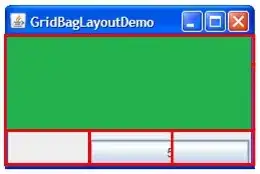
What I don't understand is why in the .xib shown here, and also available here, why I can't get the green and magenta regions to maintain a constant border (the white area between them) that gets no thicker and no thinner, no matter what happens to the size of the view.

That means I need the green area not to resize vertically and only resize horizontally, but it's insisting on anchoring itself to the bottom of the form, and although starting from a new blank nib again, will restore interface builder so it will notice adjacency of the green and magenta views again, once interface builder has gone "stupid" it insists on only defining the green view's bottom edge in terms of its distance from its parent view's bottom edge, and won't (for any amount of fiddling) do otherwise using mere drag and drop operations. I have also experimented with the Pin commands and haven't found a pin command that works.

No amount of fighting with interface builder menus or dragging and dropping seems to be enough, to get it to let go of one of the constraints. I can't figure out what I'm supposed to do. Delete a constraint? How? Constraints can't be deleted at all as far as I can see, either from the IB Objects pane or from the Utilities -> Size inspector. There is a delete option but it's grayed out in the drop down menu that appears when you click the "gear" icon button in the constraints area.

Ideally I'd love it if the green area resized as the view gets wider, but not as it gets taller or shorter. I thought this was obvious in every other tool, but in XCode+Autolayout, it's either not resize at all, or resize in all four directions. I can't delete or remove the constraints that are doing things I don't want to do. Do you have to have four constraints on each view that is inside another view?

(Update 1: You can not remove any constraint that would result in an ambiguous or unspecified layout.)

(Update 2: Sometimes if a uiview pane won't snap to a sibling, deleting that uiview and trying again will allow it to naturally "snap" to a sibling, and the constraint will be made relative to a sibling view object instead of a parent.)

(Update 3: Matt deleted his workaround, I've reproduced it below.)

Workaround for people who didn't want Autolayout in the first place, and who just wanted the old springs and struts back:

Step 1: Turn Off Autolayout:

enter image description here

Step 2: Select the Correct Autoresizing Masks:

enter image description here

Warren P
  • 65,725
  • 40
  • 181
  • 316
  • Gotta agree with Matt but in case you want to learn how to drive auto layout there's a great tut here http://www.raywenderlich.com/20881/beginning-auto-layout-part-1-of-2 – Warren Burton Feb 25 '13 at 23:07
  • It looks like you have to work around the inability to delete the root-level view's constraints on its subviews by instead finding harmless settings. Finding a harmless setting is far too hard, I think. Each control that is in the top level View, has 4 mandatory constraints. – Warren P Feb 25 '13 at 23:18
  • related: http://stackoverflow.com/questions/12840332/autolayout-to-keep-view-sizes-proportional?rq=1 – Warren P Feb 25 '13 at 23:32
  • 2
    Matt deleted his 'workaround' answer so I've reproduced the salient bits in the question because I believe it will be helpful to new users or users confused by the new default in iOS6 where Autolayout defaults to on, and nobody sent us a memo about that. – Warren P Feb 27 '13 at 15:10

2 Answers2

12

The key to editing constraints in interface builder is never to drag and drop anything once you've added it to the view. Move and arrange things by editing the constraints instead. Use the pinning menu to create new constraints. You can delete unwanted constraints once you've added sufficient new ones to unambiguously replace the automatically added system constraints.

In your case I created the following constraints:

enter image description here

I renamed your views "Green" and "Magenta" to make things clearer in the document navigator. What I have done is:

  • Pin the vertical spacing between the views
  • Pinned each view to the left and right sides
  • Pinned the top view to a set height and a set distance from the top of the superview
  • Pinned the bottom of the bottom view to the bottom of the superview.

This gives you the layout you want, I think. I have written in excruciating detail about this here, if you want to read more.

jrturton
  • 118,105
  • 32
  • 252
  • 268
  • I find that Interface builder, if you drag and drop creates duplicate/redundant constraints which are nevertheless not removable. I think this must be a bug in the constraint-generation-engine which is probably a component of interface builder. I wonder if I should report the bug or if they already know about something this hugely broken. – Warren P Feb 27 '13 at 15:11
  • It creates new constraints _and_ destroys your old ones, which is why the new constraints aren't deletable. Never dragging and dropping (once you've added your views) is the real take home message. I can sort of see why it works as it does - deciding which constraints to keep, edit or junk during a drag operation must be near impossible - but it doesn't make for great UX. – jrturton Feb 27 '13 at 20:50
  • Yeah. I think they need to make constraint nodes moveable so it doesn't have to guess. It guesses poorly and it's a poor way to surface this functionality – Warren P Feb 28 '13 at 02:49
2

This is the answer if you don't want to turn off the new iOS6 Auto Layout mode.

If the view mode for the top level view and all the sub-level views is Scale to Fill, you use the anchor mode "less than or equal" in this case, because you can't delete this constraint. The two colored views are not stored in the nib as having a size (width,height) or position (top left corner) instead they are stored with constraints representing their layout. The layout "less than or equal" instead of "equal" can be accessed by clicking on the upper square, then four constraint lines appear, select the bottom one which goes from the lower edge of the control you've selected to the bottom of the view, and change the type from Equal to Less than or Equal.

enter image description here

If the view mode is NOT Scale to fill, other constraint changes would be required. This multi-faceted design is more flexible than the old "springs and struts" but is not exactly as simple to learn.

The more obvious mode you could use is to get a constraint in between two objects. Why this is so difficult (sometimes I can do this and sometimes i can't) I still don't know.

Here's a sample when I was able to get a constraint to appear between two objects instead of from that object to its parent view, but this situation, were I able to always get Interface Builder to co-operate would be a far more intuitive way of creating a situation where the top square is not anchored to the whole view's height:

enter image description here

If the upper color view has an anchor to the view below it, this absolutely means that the reverse constraint cannot be against the same view, or else an ambiguity or "circular reasoning" situation would exist. Thus, we can have A depend on B, but not B simultaneously depend on A. So in that case, the constraint is switched to depend on the absolute height or width of the view. In this particular case that I have found, considerable trial and error seems to be required to recreate what could previously have been done incredibly intuitively before it was improved.

Finally, I find that the instructions above will appear to not work when you end up with extra constraints, which get magically added when you least expect them. Very subtly, you should see two lines instead of one, like this:

enter image description here

I am able to get Interface Builder to keep adding more and more duplicate constraints just by changing a constraint from Equals to Less than or Equal. I believe that's a bug in interface builder in XCode 4.6, and since layout contraints are a relatively new part of CococaTouch, I'm not surprised that the Interface builder support for auto-creating constraints as you drag and move items around, is buggy.

Warren P
  • 65,725
  • 40
  • 181
  • 316