3

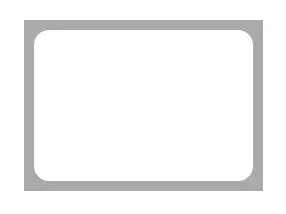
With the code below I am drawing a rounded rectangle. It draws a nice solid light gray filled rounded rectangle (at the size of "self"). I actually want to draw the pixel inverse of this, that is: not a solid rounded rectangle, but a window or hole in the shape of this round rectangle in a solid light gray rectangle.

Is there a reverse clip method that I need to use? Or do I need to use a bezier path? Excuse if this is very basic, can't find the info though.

Thanks for reading!

- (void)drawRect:(CGRect)rect
{

    // get the context
    CGContextRef context = UIGraphicsGetCurrentContext

    CGContextSaveGState(context);    

    //draw the rounded rectangle
    CGContextSetStrokeColorWithColor(context, [[UIColor blackColor] CGColor]);
    CGContextSetRGBFillColor(context, 0.8, 0.8, 0.8, 1.0);
    CGContextSetLineWidth(context, _lineWidth);

    CGRect rrect = CGRectMake(CGRectGetMinX(rect), CGRectGetMinY(rect), CGRectGetWidth(rect), CGRectGetHeight(rect));
    CGFloat radius = _cornerRadius;

    CGFloat minx = CGRectGetMinX(rrect), midx = CGRectGetMidX(rrect), maxx = CGRectGetMaxX(rrect);
    CGFloat miny = CGRectGetMinY(rrect), midy = CGRectGetMidY(rrect), maxy = CGRectGetMaxY(rrect);

    CGContextMoveToPoint(context, minx, midy);
    // Add an arc through 2 to 3
    CGContextAddArcToPoint(context, minx, miny, midx, miny, radius);
    // Add an arc through 4 to 5
    CGContextAddArcToPoint(context, maxx, miny, maxx, midy, radius);
    // Add an arc through 6 to 7
    CGContextAddArcToPoint(context, maxx, maxy, midx, maxy, radius);
    // Add an arc through 8 to 9
    CGContextAddArcToPoint(context, minx, maxy, minx, midy, radius);
    // Close the path
    CGContextClosePath(context);

    // Fill the path
    CGContextDrawPath(context, kCGPathFill);

    CGContextRestoreGState(context);

}
OWolf
  • 5,012
  • 15
  • 58
  • 93

5 Answers5

12

Here's yet another approach, using just UI object calls:

- (void)drawRect:(CGRect)rect
{
    [[UIColor lightGrayColor] setFill];
    CGRect r2 = CGRectInset(rect, 10, 10);
    UIBezierPath* p = [UIBezierPath bezierPathWithRoundedRect:r2 cornerRadius:15];
    [p appendPath: [UIBezierPath bezierPathWithRect:rect]];
    p.usesEvenOddFillRule = YES;
    [p fill];
}

Yields this:

enter image description here

The white is the background of the window; the grey is the UIView. As you can see, we're seeing right thru the view to whatever is behind it, which sounds like what you're describing.

matt
  • 515,959
  • 87
  • 875
  • 1,141
  • Nice stuff. Thanks for the answers. – OWolf Jan 04 '13 at 16:04
  • 1
    @matt great and simple answer as always. Great thanks! – Dima Deplov Feb 05 '14 at 11:03
  • I don't understand the method. It looks like p is the inner, rounded rect. If so, why are you filling p? Shouldn't you fill the gray rect? How would you extend this if you had a second rect that you need to see through? – Erika Electra Nov 02 '16 at 20:57
  • @Cindeselia "It looks like p is the inner, rounded rect" No, `p` is a compound path consisting of the outer rectangle and the inner rounded rect. And I used the even-odd rule so what I'm filling is the space between them. – matt Nov 02 '16 at 21:20
4

Add multiple subpaths to your context, and draw with mode kCGPathEOFill. The Quartz 2D Programming Guide explains in more detail.

// Outer subpath: the whole rect
CGContextAddRect(context, rrect);

// Inner subpath: the area inside the whole rect    
CGContextMoveToPoint(context, minx, midy);
...
// Close the inner subpath
CGContextClosePath(context);

// Fill the path
CGContextDrawPath(context, kCGPathEOFill);
Kurt Revis
  • 27,695
  • 5
  • 68
  • 74
4

For a drop-in solution:

  1. Add PortholeView.swift to your Xcode 6 (or higher) project

    import UIKit
    
    @IBDesignable class PortholeView: UIView {
      @IBInspectable var innerCornerRadius: CGFloat = 10.0
      @IBInspectable var inset: CGFloat = 20.0
      @IBInspectable var fillColor: UIColor = UIColor.grayColor()
      @IBInspectable var strokeWidth: CGFloat = 5.0
      @IBInspectable var strokeColor: UIColor = UIColor.blackColor()
    
      override func drawRect(rect: CGRect) {
        // Prep constants
        let roundRectWidth = rect.width - (2 * inset)
        let roundRectHeight = rect.height - (2 * inset)
    
        // Use EvenOdd rule to subtract portalRect from outerFill
        // (See http://stackoverflow.com/questions/14141081/uiview-drawrect-draw-the-inverted-pixels-make-a-hole-a-window-negative-space)
        let outterFill = UIBezierPath(rect: rect)
        let portalRect = CGRectMake(
          rect.origin.x + inset,
          rect.origin.y + inset,
          roundRectWidth,
          roundRectHeight)
        fillColor.setFill()
        let portal = UIBezierPath(roundedRect: portalRect, cornerRadius: innerCornerRadius)
        outterFill.appendPath(portal)
        outterFill.usesEvenOddFillRule = true
        outterFill.fill()
        strokeColor.setStroke()
        portal.lineWidth = strokeWidth
        portal.stroke()
      }
    }
    
  2. Bind your target view in Interface Builder

enter image description here

  1. Adjust the insets, outer-fill color, stroke color, and stroke width right in IB!

enter image description here

  1. Set up your constraints and other views, keeping in mind that you may very well have to modify PortholeView if you need your rect to scale in special ways for rotation and whatnot. In this case, I've got a UIImage behind the PortholeView to demonstrate how the round rect gets "cut out" of the surrounding path thanks to the 'even odd rule'.

enter image description here

Thanks to @matt for the underlying drawing code & to Apple for exposing IBInspectable/IBDesignable in Interface Builder.

P.S. This venerable Cocoa with Love post will help you understand the "even/odd" rule, and its sibling, the "winding" rule, as well as providing some additional strategies for drawing cutout shapes. http://www.cocoawithlove.com/2010/05/5-ways-to-draw-2d-shape-with-hole-in.html

clozach
  • 5,118
  • 5
  • 41
  • 54
1

Another approach: use UICreateGraphicsContextWithOptions(size, NO, 0) to make a bitmap. Draw the rectangle into the bitmap. Switch to the erasure blend mode:

CGContextSetBlendMode(con, kCGBlendModeClear);

Now draw the ellipse path and fill it. The result is a rectangle with a transparent elliptical hole. Now close out the image graphics context and draw the image into your original context.

matt
  • 515,959
  • 87
  • 875
  • 1,141
  • 1
    That will work, but will be a lot slower than just filling the correct path in the first place. Also, if you ever wanted to print or export to PDF, the quality would not be very good, and your PDF would be a lot larger than necessary. – Kurt Revis Jan 04 '13 at 04:41
1

I have been looking around for to do this a project I'm working on.

I ended up doing something like this.

enter image description here

I hope this helps someone.

Swift code:

import UIKit

class BarCodeReaderOverlayView: UIView {

    @IBOutlet weak var viewFinderView: UIView!

    // MARK: - Drawing

    override func drawRect(rect: CGRect) {
        super.drawRect(rect)

        if self.viewFinderView != nil {
            // Ensures to use the current background color to set the filling color
            self.backgroundColor?.setFill()
            UIRectFill(rect)

            let layer = CAShapeLayer()
            let path = CGPathCreateMutable()

            // Make hole in view's overlay
            CGPathAddRect(path, nil, self.viewFinderView.frame)
            CGPathAddRect(path, nil, bounds)

            layer.path = path
            layer.fillRule = kCAFillRuleEvenOdd
            self.layer.mask = layer
        }
    }

    override func layoutSubviews () {
        super.layoutSubviews()
    }

    // MARK: - Initialization

    required init?(coder aDecoder: NSCoder) {
        super.init(coder: aDecoder)
    }

    override init(frame: CGRect) {
        super.init(frame: frame)
    }
}
James Laurenstin
  • 506
  • 1
  • 6
  • 13