13

I'm writing my first iOS app targeting the iOS 5.0+ platform. I'm using the UIAppearance protocol to customize the applications UI.

I'm trying to change the backgrounds for UIBarButtonItem across the entire application. Due to the fact that my UIBarButtonItem's may change size depending on the text or icon used I'm trying to utilize UIImage resizableImageWithCapInsets: with my background png.

I originally found the code I needed on Ray Wenderlich. Using the same exact code, with an image that's pretty close to the one used in the aforementioned tutorial, I'm getting weird results. Maybe it's just my inexperience with Cocoa Touch.

Here is the code I'm using.

DreamsAppDelegate.m - customizeAppearance:

UIImage *btnBg = [[UIImage imageNamed:@"navBarButton-bg"] 
          resizableImageWithCapInsets:UIEdgeInsetsMake(0, 6, 0, 6)];

[[UIBarButtonItem appearance] setBackgroundImage:btnBg 
                                        forState:UIControlStateNormal 
                                      barMetrics:UIBarMetricsDefault];

Here is the png background image I'm trying to use

png background

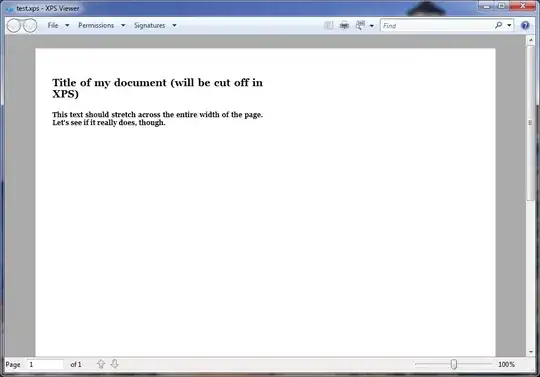
And here is the result (in the simulator)

result of trying to use resizableImageWithCapInsets:

Brandon Cordell
  • 1,308
  • 1
  • 9
  • 24

2 Answers2

19

The section of your image between the left and right, and between the top and bottom, is tiled to fill the space needed by the image. Try UIEdgeInsetsMake(15, 6, 15, 6).

To generalize, if your image has a continuous gradient, the repeated section should only be 1 pixel high. Since your button image is 31 pixels high, the top and bottom (the first and third arguments to UIEdgeInsetsMake) should add to 30. They don't have to be equal; UIEdgeInsetsMake(8, 6, 22, 6) will move the repeated section up, resulting in a paler background.

Also, is the file you've attached the plain or the retina ('@2x') version of the image? The insets have to be within the size of the plain version.

Cowirrie
  • 7,218
  • 1
  • 29
  • 42
  • Thanks for your response. The image posted is @2x. So I should cut me measurements to (0, 3, 0, 3)? You're saying I should make the middle of my image 1px wide? I understand why that would be, but the tutorial I followed had an image that was 30px by 40px, with the same style gradient as myself and it seems to work fantastic (with the UIEdgeInsetsMake that I'm using now, just adjusted by a pixel because of my corner radii). – Brandon Cordell Apr 25 '12 at 12:20
  • Here's the trick: you can use 0 for the top and bottom _if_ your background image is the same height as a navigation bar button. It just fills that space with your existing gradient. Your image is _not_ the height of a retina navigation button, so it will either be stretched or repeated to fill that height. You must provide a top and bottom cap size (the first and third arguments). Start with `(7, 3, 7, 3)`. This will leave some striping, but hopefully give a clearer idea of what's going on. – Cowirrie Apr 25 '12 at 12:34
  • Ahh that does make a bit more sense. What is the size of a retina navBar button? I'm slicing my UI elements off of a retina sized PSD file, so if I need to make the navBar button bg bigger on the psd file and export it to get what I need, that will make it easy on me. – Brandon Cordell Apr 25 '12 at 13:06
  • Just from taking a screenshot and measuring, they seem to be 60 pixels high. However, your components will be far more robust if you make sure your capped images can be scaled to any size. Did it work with `(7, 3, 7, 3)`? Can you see why? – Cowirrie Apr 25 '12 at 13:40
  • It looks a little better, but still wrong. See this screenshot: http://i.imgur.com/9KEjj.png – Brandon Cordell Apr 25 '12 at 13:55
  • That is where it's taking `7*2=14` pixels to be the top and bottom caps. That leaves 3 rows of pixels in the middle of your image. You're filling a 60 pixel space, so there are 32 rows of pixels to fill in the middle with. It repeats those 3 pixels 10 and a bit times to fill that space. Now you've seen how it works, you probably should generate a new image file - probably one with more rounded corners. You will then need to change your insets to fit your new image. – Cowirrie Apr 25 '12 at 14:27
  • Can't thank you enough Dondragmer, hope this helps others out as well. – Brandon Cordell Apr 25 '12 at 14:58
  • Take also care that your image view have its `contentMode` set to `UIViewContentModeScaleToFill` – ıɾuǝʞ Jun 04 '13 at 13:56
17

I have the exact same problem.

Another thing you can do is to set the resizingMode of UIImageResizingModeStretch. It solved my problem.

Hopwever, it's not available in IOS5. So my solution would be to do as everyone else said. Realize that the tileable side should be just one pixel. Most buttons do not change much in the middle anyway.

So, use this code:

-(UIImage *) resizableImageWithCapInsets2: (UIEdgeInsets) inset
    {
        if ([self respondsToSelector:@selector(resizableImageWithCapInsets:resizingMode:)])
        {
            return [self resizableImageWithCapInsets:inset resizingMode:UIImageResizingModeStretch];
        }
        else
        {
            float left = (self.size.width-2)/2;//The middle points rarely vary anyway
            float top = (self.size.height-2)/2;
            return [self stretchableImageWithLeftCapWidth:left topCapHeight:top];
        }
    }
Anonymous White
  • 2,149
  • 3
  • 20
  • 27