0

I'm not sure if this is an issue with changing the domain name on a WordPress site, or an issue with configuring SSL certs between Nginx and Cloudflare. I suspect it's a bit of both.

I've setup two 2 different WordPress sites, one with Digital Ocean, the other with Scaleway, both using the respective pre-built WordPress Ubuntu images.

With Digital Ocean, Apache comes preconfigured, and with Scaleway they have Nginx.

When I pointed my domain to the Apache-based host, everything 'just worked', including HTTPS.

When I pointed my domain to the Nginx-based host, all my asset files fail because the requests go out via HTTP, so I get back "Referrer Policy: no-referrer-when-downgrade". This seems to be that PHP doesn't detect HTTPS.

Do I need additional setup steps for Nginx to work with Cloudflare? Why does Cloudflare SSL work with Apache without any extra steps?

Here is my current vhost config for nginx. It has some minor updates from the original default state.

server {
  listen 80 default_server;

  listen 443 ssl default_server;
  listen [::]:443 ssl default_server;

  client_max_body_size 200M;

  root /var/www;
  index index.php index.html index.htm;

  location / {
          try_files $uri $uri/ /index.php?q=$uri&$args;
  }

  error_page 404 /404.html;

  error_page 500 502 503 504 /50x.html;
  location = /50x.html {
          root /usr/share/nginx/html;
  }

  location ~ \.php$ {
          try_files $uri =404;
          fastcgi_split_path_info ^(.+\.php)(/.+)$;
          fastcgi_pass unix:/var/run/php/php7.0-fpm.sock;
          fastcgi_index index.php;
          include fastcgi_params;
          fastcgi_param  SCRIPT_FILENAME    $document_root$fastcgi_script_name;
         # proxy_set_header X-Forwarded-Proto $scheme;
  }

  location ~* \.(eot|otf|ttf|woff|woff2)$ {
          add_header Access-Control-Allow-Origin *;
         # add_header Referrer-Policy origin always;
         # proxy_set_header X-Forwarded-Proto $scheme;
  }
}

[UPDATE]

Adding this PHP code to my project provided a partial fix. At least, with this added, the site and all the assets load.

if (isset($_SERVER['HTTP_X_FORWARDED_PROTO']) && $_SERVER['HTTP_X_FORWARDED_PROTO'] == 'https')
    $_SERVER['HTTPS'] = 'on';

However, I can't login with my WP user. I always get this message:

You do not have sufficient permissions to access this admin page.

Reason: The current user doesn't have the "read" capability that is required to access the "Dashboard" menu item.

UPDATE:

After deleting all files in the plugins directory, the message became this:

Sorry, you are not allowed to access this page.

Also went thru the process of download the WP database and rewriting every occurrence of the domain name with the new domain name, but after importing the data, I still can't login.
rm.rf.etc
  • 161
  • 5
  • Which [CloudFlare SSL setting](https://support.cloudflare.com/hc/en-us/articles/200170416-What-do-the-SSL-options-mean-) did you use? – Michael Hampton Dec 14 '18 at 13:58
  • I believe you have a few things going on, but yeah Nginx does not work out of the box with WordPress, there is some initial configuration that I provided below to get your Nginx reading PHP, because it does not do so by default. I would get that working and then ask a more specific question regarding nginx and cloudflare or nginx and ssl. – Daniel Dec 15 '18 at 11:39
  • @MichaelHampton, Flexible, the default setting. Also tried full and full (strict), but changed it back to flexible because I was able to get the site to render with flexible and after forcing HTTPS in PHP. – rm.rf.etc Dec 16 '18 at 04:08
  • I suggest you disable CloudFlare, install Let's Encrypt, and then re-enable CF with SSL set to Full (Strict). – Michael Hampton Dec 16 '18 at 05:17

1 Answers1

1

Before you start setting up your WordPress site using Nginx as your web server you need to perform some housekeeping. You need to create backup copies of your main configuration files.

By default Nginx does not process PHP. Nginx will pass PHP processing to php7.0-fpm, but you need to enable that. You need to:

cd /etc/nginx

$ ls -l
total 76
drwxr-xr-x 2 root root 4096 Jul 12  2017 conf.d
-rw-r--r-- 1 root root 1077 Feb 11  2017 fastcgi.conf
-rw-r--r-- 1 root root 1007 Feb 11  2017 fastcgi_params
drwxr-xr-x 2 root root 4096 Oct  3  2017 global
-rw-r--r-- 1 root root 2837 Feb 11  2017 koi-utf
-rw-r--r-- 1 root root 2223 Feb 11  2017 koi-win
-rw-r--r-- 1 root root 3957 Feb 11  2017 mime.types
drwxr-xr-x 2 root root 4096 Jul 12  2017 modules-available
drwxr-xr-x 2 root root 4096 Sep 23  2017 modules-enabled
-rw-r--r-- 1 root root 1042 Dec 15 06:05 nginx.conf
-rw-r--r-- 1 root root 1505 Sep 23  2017 nginx.conf.bak
-rw-r--r-- 1 root root  180 Feb 11  2017 proxy_params
-rw-r--r-- 1 root root  636 Feb 11  2017 scgi_params
drwxr-xr-x 2 root root 4096 Nov  4 06:10 sites-available
drwxr-xr-x 2 root root 4096 Oct  3  2017 sites-enabled
drwxr-xr-x 2 root root 4096 Nov  4 06:10 snippets
drwxr-xr-x 2 root root 4096 Sep 23  2017 ssl
-rw-r--r-- 1 root root  664 Feb 11  2017 uwsgi_params
-rw-r--r-- 1 root root 3071 Feb 11  2017 win-utf

The main configuration file is nginx.conf and its owned by root so you need to use sudo like so: sudo cp nginx.conf nginx.conf.bak

Next: cd sites-available

$ ls -l
total 16
-rw-r--r-- 1 root root  526 Oct 10  2017 dancortes.press
-rw-r--r-- 1 root root 2410 Dec 14 16:49 default
-rw-r--r-- 1 root root 2410 Sep 23  2017 default.bak
-rw-r--r-- 1 root root 3211 Nov 27 13:08 microurb.com

default is the default Nginx page that appears on your browser if you type in your ip address.

sudo cp default default.bak

The actual file you are viewing in your browser is this one:

cd /var/www/html

$ ls -l
total 8
-rw-r--r-- 1 root     root      20 Dec 14 08:50 ghi.php
-rw-rw-r-- 1 microurb www-data 612 Sep 22  2017 index.nginx-debian.html

I am referring to: index.nginx-debian.html. That file is owned by root root originally, but notice the permission changes I made to it. You need to do the same. Also, observe all the permission settings in everything I have pasted thus far, you want your permission settings to look exactly like what you see above for everything you see above.

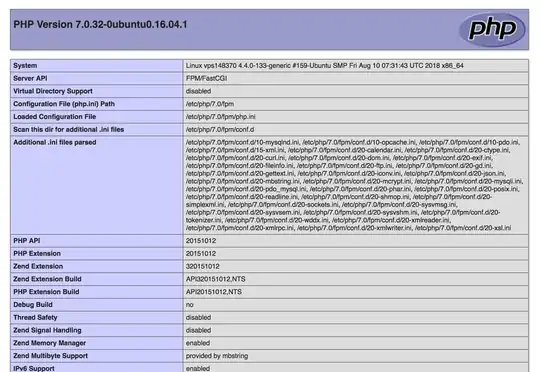
You will also notice I have a ghi.php, that is to test whether your Nginx server is processing PHP. You create the file via sudo vim ghi.php or sudo nano ghi.php whichever you prefer.

Inside of it you want to paste a simple PHP request like so:

<?php
phpinfo();
?>

Exit saving the changes to the file. Then go to your browser `/ghi.php if you cannot view this: enter image description here

then your Nginx server is not processing PHP. So then you need to: cd /etc/nginx, cd sites-available.

By now you should already have a back of default like so:

-rw-r--r-- 1 root root 2410 Dec 14 16:49 default
-rw-r--r-- 1 root root 2410 Sep 23  2017 default.bak

You can now edit the default file: sudo vim default

location ~ \.php$ {
      include snippets/fastcgi-php.conf;

      # With php-fpm (or other unix sockets):
      fastcgi_pass unix:/var/run/php/php7.0-fpm.sock;
    # # With php-cgi (or other tcp sockets):
    # fastcgi_pass 127.0.0.1:9000;
    }

    # deny access to .htaccess files, if Apache's document root
    # concurs with nginx's one
    #
    #location ~ /\.ht {
    # deny all;
    #}
  }

The first line above with the ~ performs a regular expression on PHP looking for PHP files to read. In your case, it may be commented out, so uncomment that and the line to use snippets.

You also want to uncomment this line: fastcgi_pass unix:/var/run/php/php7.0-fpm.sock;

Also remove the hash at the last bracket.

The location directive will now process PHP files including fastcgi_pass which will pass the PHP to php7.0-fpm

Exit, saving changes.

Test the configuration: sudo nginx -t and you want to see this:

$ sudo nginx -t
nginx: the configuration file /etc/nginx/nginx.conf syntax is ok
nginx: configuration file /etc/nginx/nginx.conf test is successful

sudo service nginx reload

Go back to your browser: `/ghi.php and you should see that output I displayed above.

Don't forget to do what I obviously forgot to do:

cd /var/www/html/

$ ls -l
total 8
-rw-r--r-- 1 root     root      20 Dec 14 08:50 ghi.php
-rw-rw-r-- 1 microurb www-data 612 Sep 22  2017 index.nginx-debian.html

sudo rm ghi.php

Daniel
  • 219
  • 1
  • 4
  • 14