4

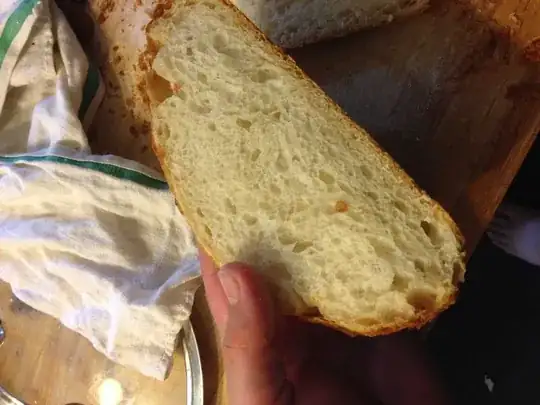
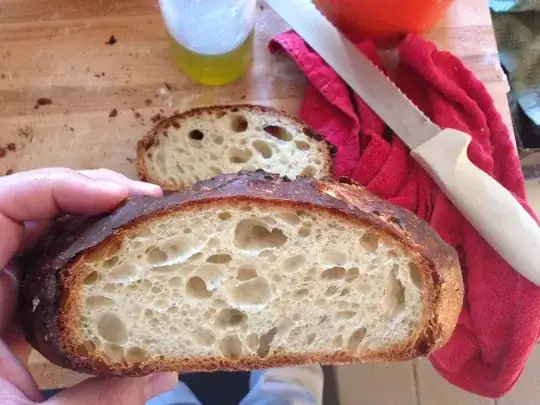
No matter what I do, my recipe produces bread that is pretty dense, I get none of those nice huge holes in the crumb. My recipe goes like this:

  • 500g flour (300g wheat, 200g rye)
  • 350ml water
  • 2 tbsp vinegar
  • two pinches of salt
  • I use 1 packet of dry active yeast (for 500g of flour) or fresh yeast (20g)

I typically use my my stand mixer w/ dough hook to mix this for about 5-10 minutes. Then let it proof for 20 minutes, flatten and let rise for another hour. Then I bake the bread starting at 260 celsius for the first ten minutes, then decreasing to 200-200 until finished. I create steam at the beginning by pouring hot water on a baking tray.

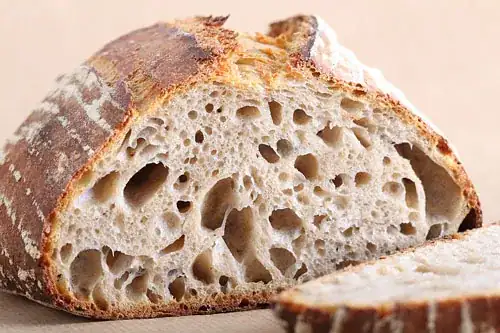
What could possible be wrong with my recipe that prevents me from getting crumb like this? Is that only achievable with sourdough starter? I experimented with that for a while and my results were a little bit better, but not quite where I want to be.

desired bread crumb

VoY
  • 1,152
  • 6
  • 17
  • 30
  • Is your recipe intended to produce bread with large air pockets? If yes, have you tried different recipes for the same kind of bread? – Marti Feb 27 '15 at 20:52
  • Not an answer, but may be of use: http://cooking.stackexchange.com/questions/47667/should-ciabatta-sandwich-rolls-be-dry-and-dense/47674#47674 – Jolenealaska Feb 27 '15 at 21:10
  • 3
    Your method is almost guaranteed to produce small, uniform bubbles, if not, it would be considered a mistake (bakers can be a bit weird...). For these large holes, try a stretch and fold technique instead of classic kneading. – Stephie Feb 27 '15 at 21:36
  • @rfusca thank you for finding the duplicate, I was sure it must exist, but couldn't find it yesterday – rumtscho Feb 28 '15 at 07:30
  • I was pretty sure such question must exist already, but wanted advice tailored to the particular recipe/method I am using. I believe such questions should not necessarily be marked as duplicates. – VoY Mar 01 '15 at 19:14

2 Answers2

5

In order to get large bubbles like you see in a Ciabatta you want to knead your bread as little as possible. Literally I mean knead it till just smooth but no longer. You really don't want to stretch any of the gluten. The more you stretch it the stronger it gets which is not what you want when trying to create nice UN-even air pockets.

On top of this, you DO NOT want to be knocking it back at all. I tend to prove my Ciabatta style bread on what ever I intend on cooking it on. That way I don't risk over handling it.

Also you want to let it gently prove, at room temperature. No hot box or heat lamps at all.

Doug
  • 4,324
  • 1
  • 17
  • 28
  • Are you able to get largish bubbles even using active dry yeast and not using the stretch and fold technique? – VoY Mar 01 '15 at 20:04
4

There are a couple of things you can try to encourage large irregular bubbles.

  • Let your dough rise longer. A longer proofing period will yield larger bubbles. There is a limit to this though (about 18-24 hrs) because the yeast will eventually fizzle out.
  • Handle the dough gently. Punching down the dough acts to homogenize the bubble size, so you'll want to avoid this. When shaping the final loaf, be gentle as vigorous shaping will pop those bubbles you've worked so hard to build.
  • Develop a better gluten structure. The stronger the dough, the better it can hold those big bubbles without popping and allows the loaf to stand tall in the oven instead of drooping or flattening.
  • Use the stretch and fold method. This is what really took my bread to the next level consistency wise. Again be gentle when stretching and folding.

My bread routine looks something like this.

  • Get home from work and shaggily mix dough (65-75% hydration by weight).
  • Stretch and fold every 45 minutes until the dough is well developed (usually 4-5 times).
  • Stash in the fridge overnight.
  • Pull out of the fridge in the morning and stash somewhere cool.
  • Get home from work again and stretch and fold one or two more times until the dough is perfect then shape the loaf. Final proofing takes anywhere from 2-3 hours.

This is what my bread generally looks like when I'm feeling lazy and just punch it down a few times then shape it. enter image description here

This is what my bread generally looks like when I take the time to do a long rise using the stretch and fold technique. enter image description here enter image description here

Derpy
  • 910
  • 4
  • 9
  • Great answer! Can stretch and fold be used with active dry yeast or is that something used with sourdough starters? What is the minimum time one can make bread using this technique? – VoY Mar 01 '15 at 20:06
  • @VoY I use active dry yeast all of the time, just not the rapid rise stuff. The minimum time I've ever done is around 6 hours. 3 hours of stretching and folding and 3 hours final proofing. That said, I have seen popular recipes that say to stretch and fold every 20 minutes for an hour. Then allow dough to rest for another 20 before final shaping. Proof for 2-3 hours at room temp and gently toss in a screaming hot dutch oven or whatever pre-heated baking surface you prefer. For an even less involving recipe, try Alton Brown's "No Knead Sourdough" plus a few stretch and folds. It works great. – Derpy Mar 02 '15 at 01:03